How To Create a Daraz Seller Account
Do you want to sell your products in pakistan? If yes then In this guide you will learn how to create daraz seller account.
Creating a seller account on Daraz, one of South Asia’s largest e-commerce platforms, is an important step for any business or individual looking to expand their online presence and reach a wider customer base. It is a group of Alibaba.
We will guide you through setting up a seller account on Daraz, from initial registration to making your products live on the platform.
By the end of this article, you will clearly understand each step and be ready to start selling on Daraz.
Step-by-Step Guide to Creating a Daraz Seller Account
Daraz Seller account creation is important to start selling products on Daraz. Here we provide you with a step-by-step guide for creating an account on Daraz.
Visit the Daraz Seller Center
To create a daraz seller account you have to visit the daraz seller website. You can easily find it. Type your country name with Daraz Seller on your favorite search engine. For example, if you are in Pakistan, search for Daraz Seller Center Pakistan.
Visiting the Daraz Seller Center website will give you all the information and resources you need to create a seller account and sell your products. The website interface will provide you with step-by-step guidance so you can easily create your seller account and become successful on the Daraz platform.
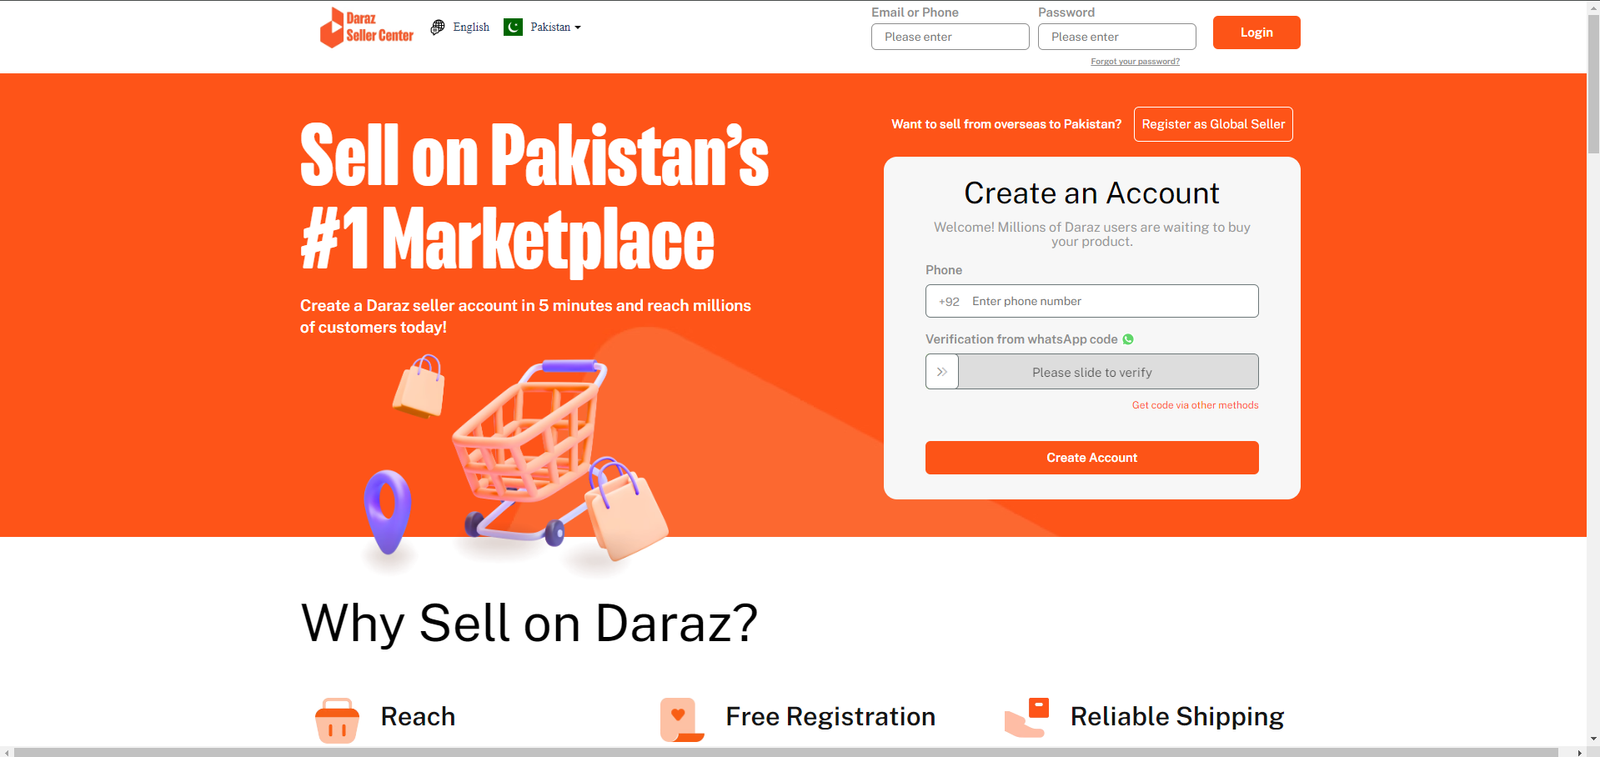
Step 1: Register as a New Seller
The this step is to register as a new seller. For this, you have to find the register or sign up button. Click this button will start the registration process.
When you reach the registration page, you have to fill out a form. In which some basic information has to be provided. This information is usually below:
Phone Number: Enter a mobile number that will be used for verification.
Mobile Number Verification: A verification code will be sent to your mobile number. Open your mobile phone and see the SMS sent by the daraz.
Enter the verification code given in the SMS on the Daraz website. So the verification process will help you to verify your account
Password: Create a password to strengthen your account.
Note: The password must have 8 characters,1 uppercase letter,1 number and1 symbol.
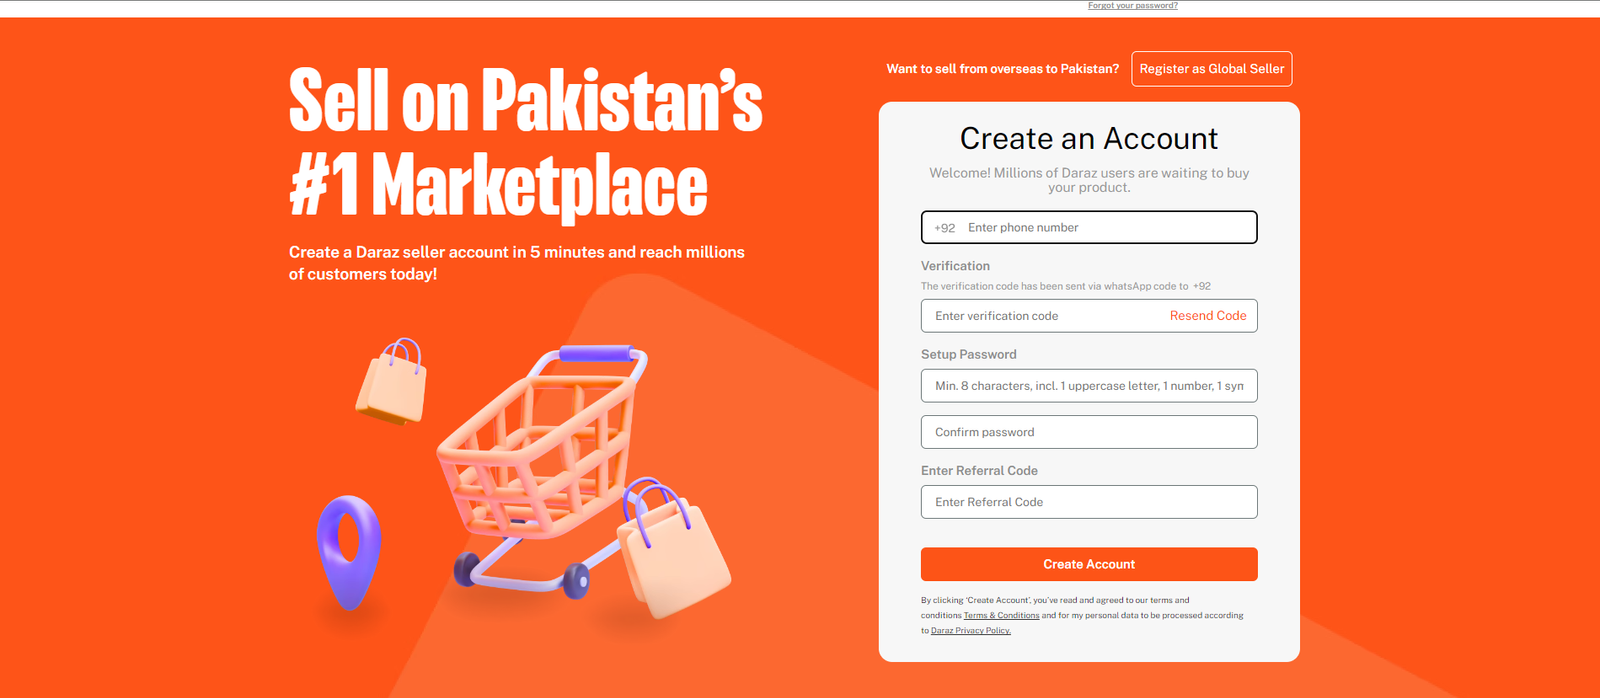
After providing this information, you have to click on the create account button.
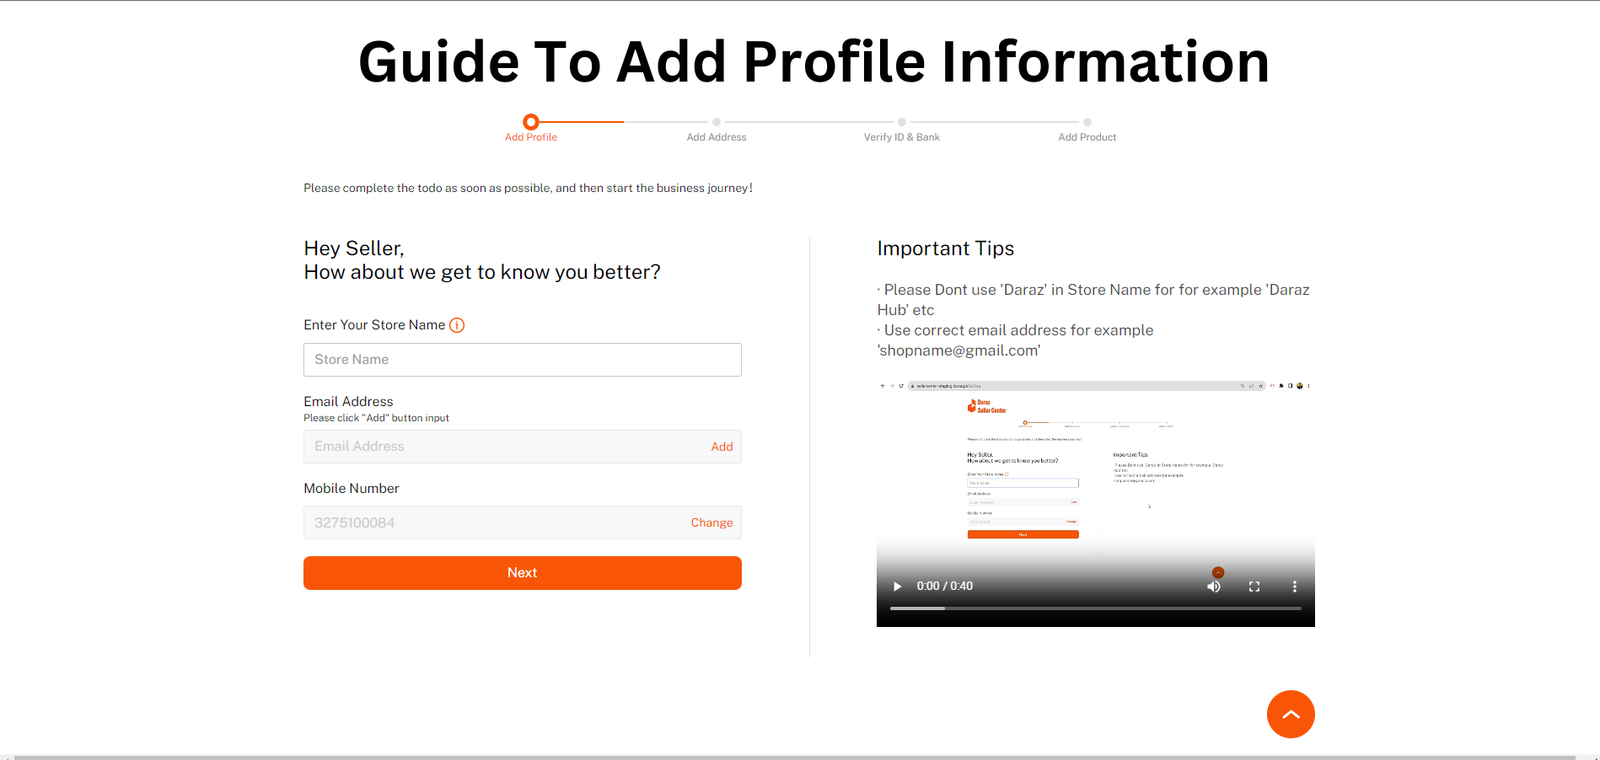
Step 2: Add Your Profile Information
In the 2nd step of creating a Daraz seller account you have to complete your profile information.
Here you have to add the following details:
Your shop name: You have to enter your shop name.
Email address and Phone number: Enter your email address and phone number and verify it by clicking on the verification button. Then you will get verification codes by daraz. Enter these codes on the verification sections
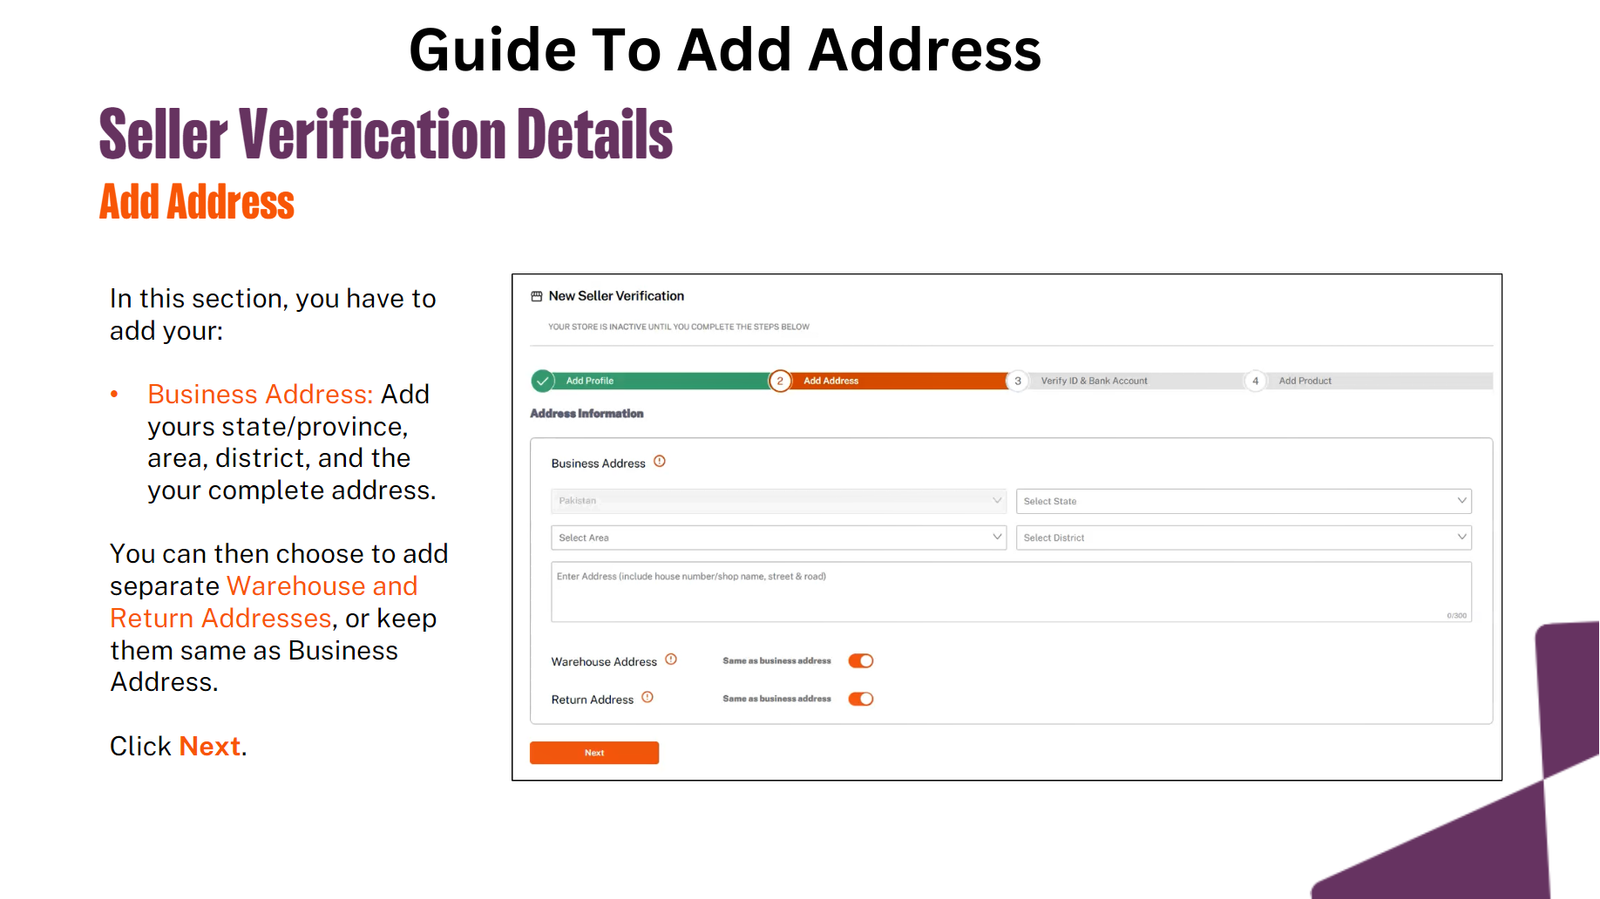
Step 3: Add Address
In the third step of creating a seller account on Daraz, you must upload the necessary documents. In this step you have to add your address information.
Firstly add your state name for example (punjab,sindh,blochistan and kpk).
Then add the name of your area where you are living.
The next step is to add your district name for example ( sialkot,lahore,krachi etc).
Then add your compelete address where you receive your failed delivery parcel. You can then choose to add separate warehouse and return addresses,or keep them same as a buisness adress.
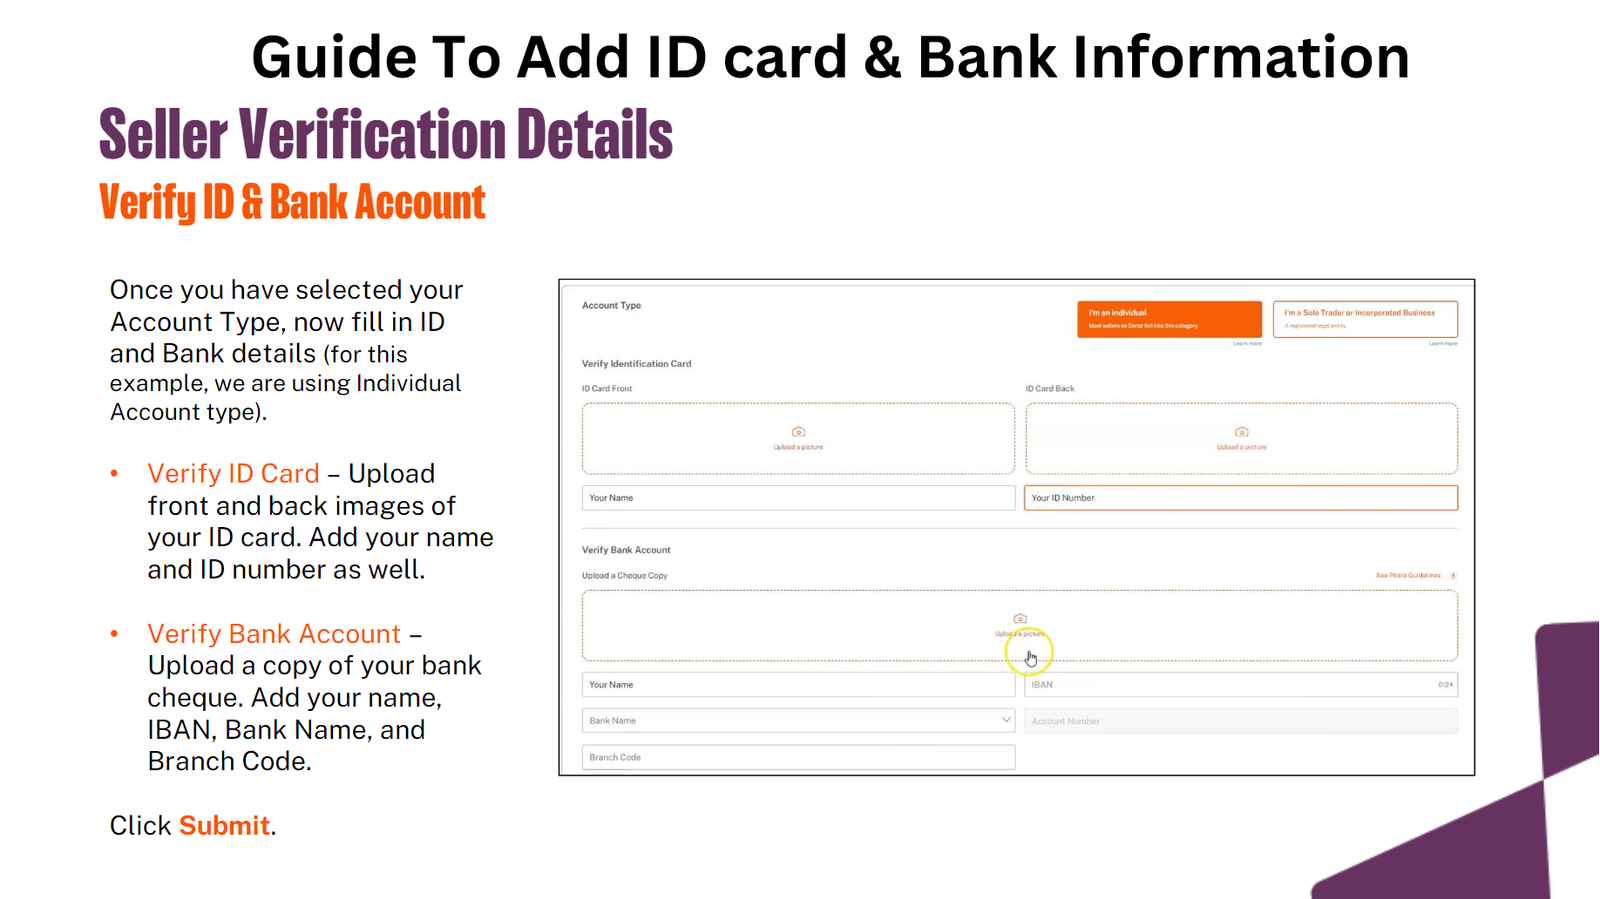
Step 4: Add Id Card & Bank Details
In this step you have to enter your id card and bank details.You have to add the bank details so that you can get the payment for the orders that have been delivered. You can also add details of your easypaisa and jazzcash account in this step.
The procedure of these steps are listed below:
First select your account type which is individual.
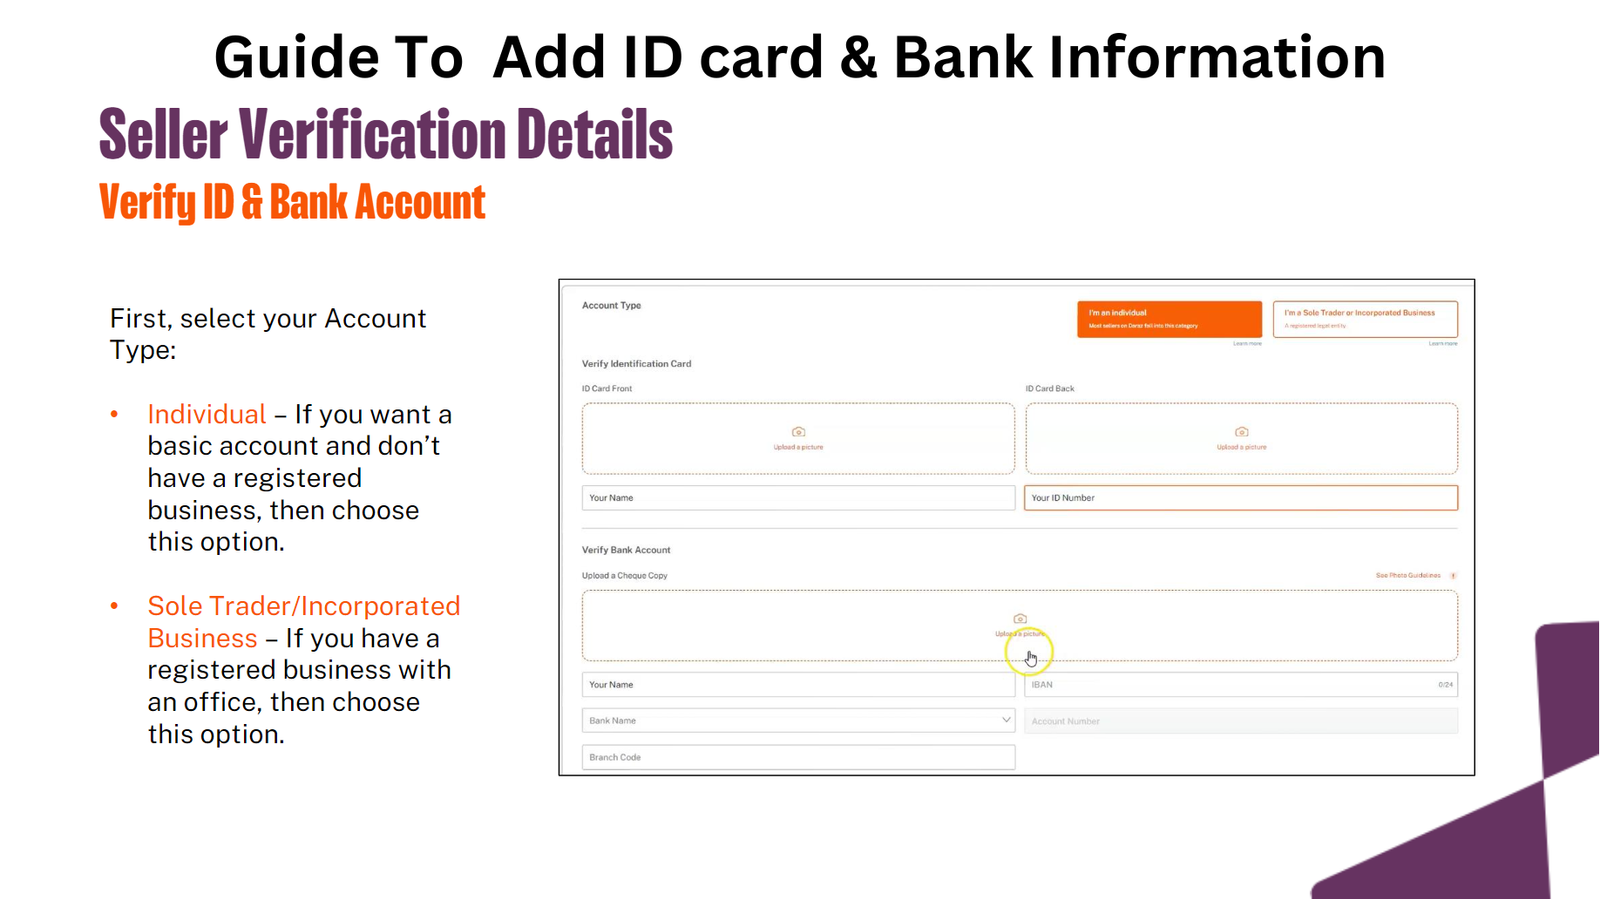
Then add your id information. First you have to upload front and back images of your id card. Images should be clear, not blurry. Add your name and id number as well.
Upload the image of your bank cheque book. Add your name,IBAN,bank name and branch code.
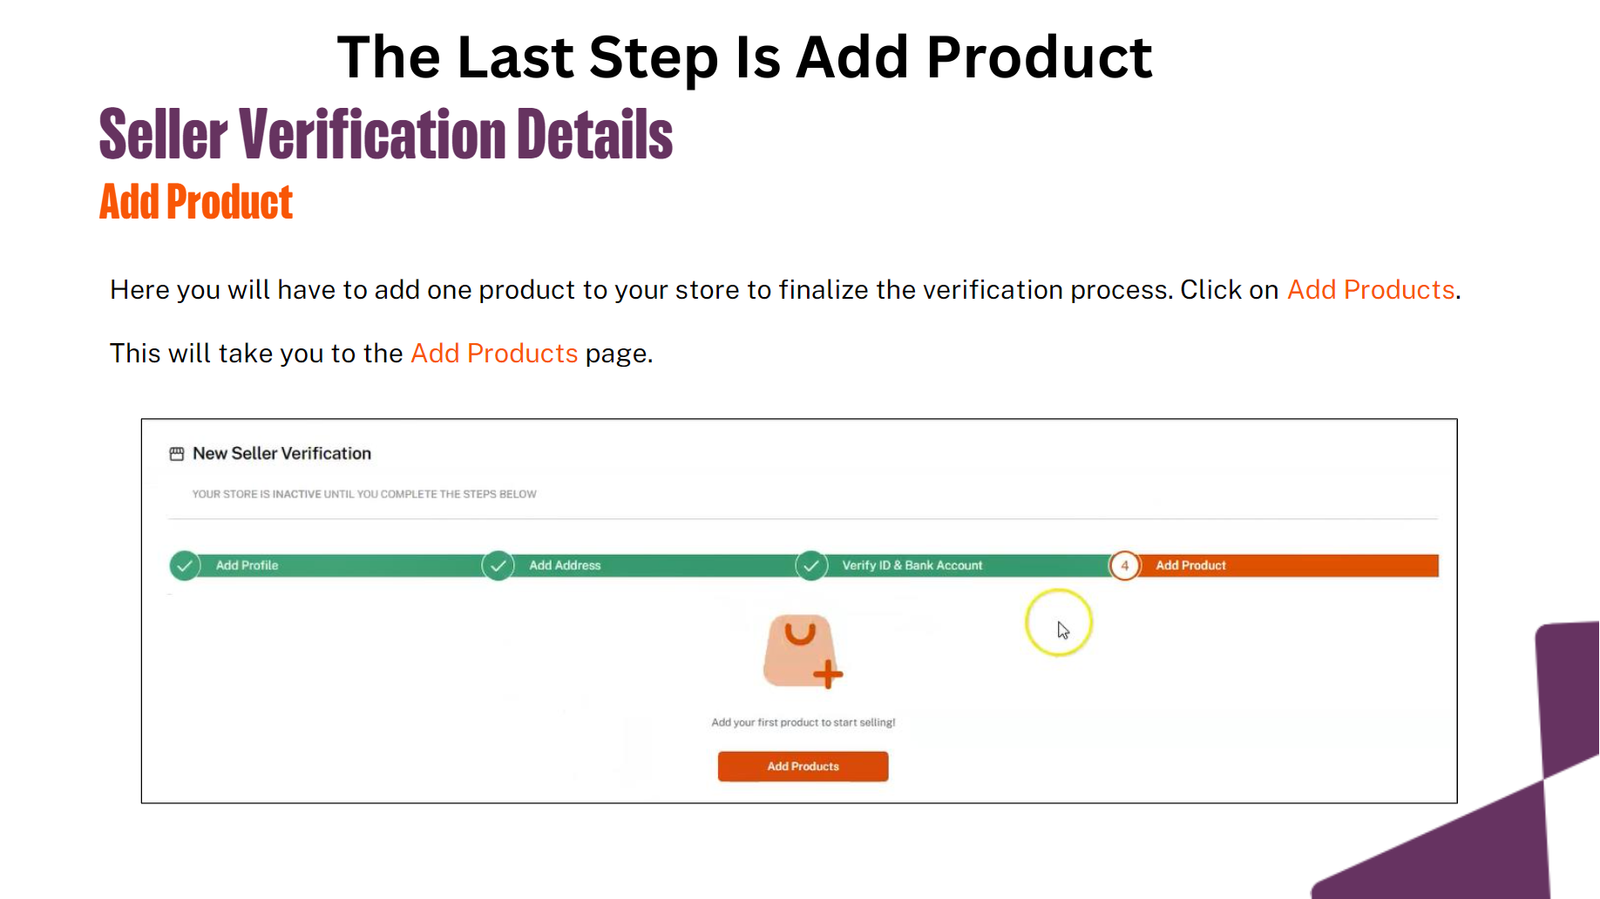
Step 5: Add Product
The last step of the account creation is to add your product on daraz that you want to sell.
Review and Submit
After add your product you must review all the information and documents that you provided. This step is essential so that you can be sure that all the information is correct and complete.
All Information Review:
Basic Information: Your name, email, and phone number must be correct and complete.
Business matters: Your business name, address, and other details are correct.
Documents: All the required documents are uploaded and it is clear and legible.
Verify: Once again check all your information and uploaded documents. This will ensure that no important information or documents are stolen.
Submit Application:
When you are satisfied that all the information and documents are correct, click on the submit button. After submitting your application, you will be reviewed and notified of approval or any information required. If your application is approved, your seller account will be activated and you can start selling your products on Daraz.
Await Approval
The next step is to wait for your seller account to be approved by the daraz. This step is important because the Daraz team will review the information and documents you provide and make sure everything is correct and complete.
Application Review:
Daraz’s team will conduct a detailed review of the information provided and uploaded documents in the application and confirm that your business and the information provided are by Daraz’s policies and standards.
Approval Process:
The approval process may take a 24 to 48 hoursto complete, so be patient.
The Daraz team will contact you if they require any further information or documentation.
Notice of Approval:
When your seller account is approved, Daraz will notify you via email or SMS.
After approval, you can use your seller account by logging into the Daraz Seller Center.
In case of any problems:
If Daraz notices a problem with your application or needs more information, they will contact you.
You must follow the instructions provided and provide the required information or documents.
Once approved, you can start selling your products by listing them on Daraz’s platform. After this step is completed, your seller account will be activated and you will be able to offer your products and services on Daraz.
Up Your Seller Account
After getting your seller account approved at Daraz, the next step is to fully set up your account. This phase involves adding your products, configuring your storefront, and learning the various features of the platform.
Add More Products:
Product Information:
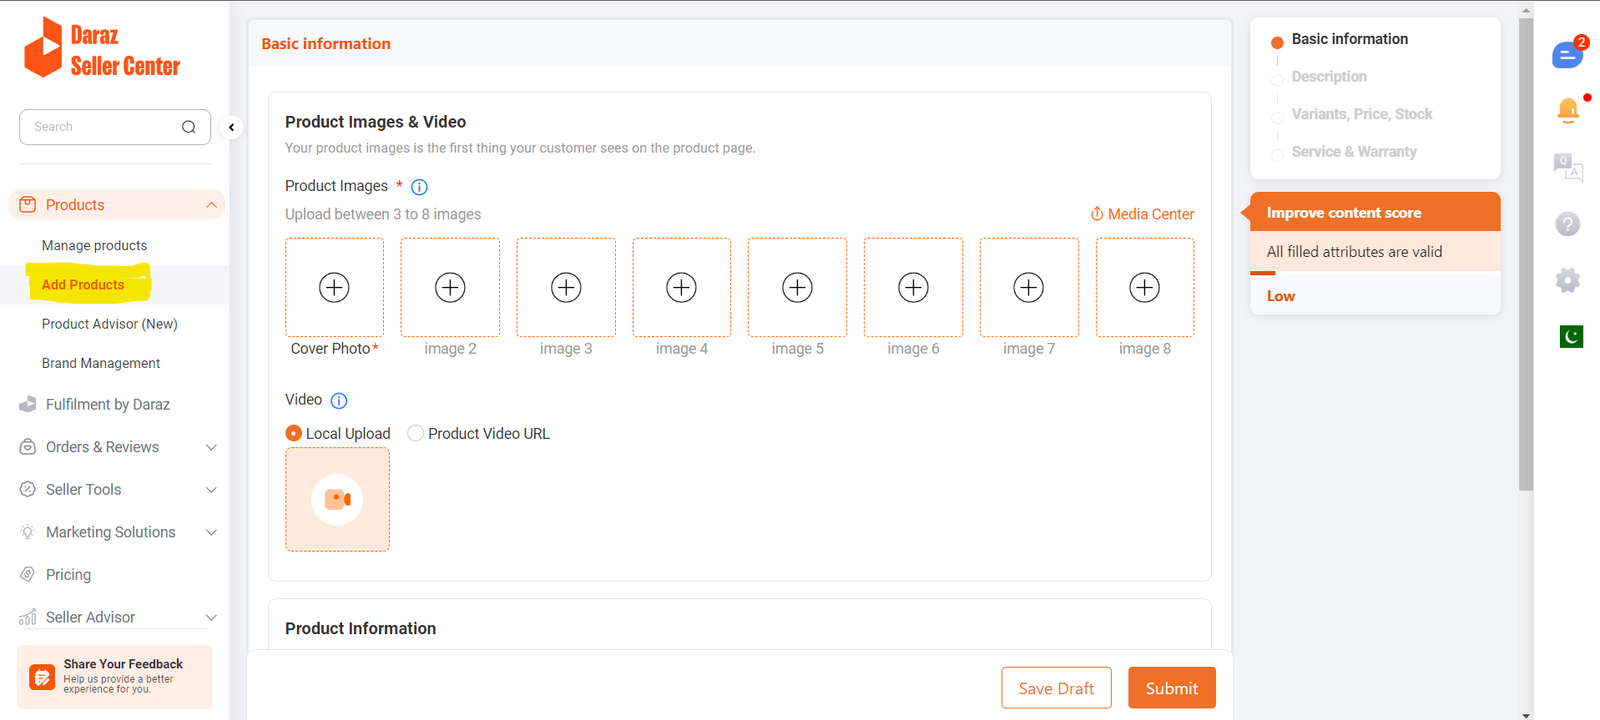
Product Name: Enter the correct and complete name of each product.
Description: View the full description of the product including its features and benefits.
Price: Enter the price of each product.
Product Category: Add each product to the right category so that buyers can easily find them. Stock information: Enter the availability and stock quantity of each product so that buyers know whether the product is available or not.
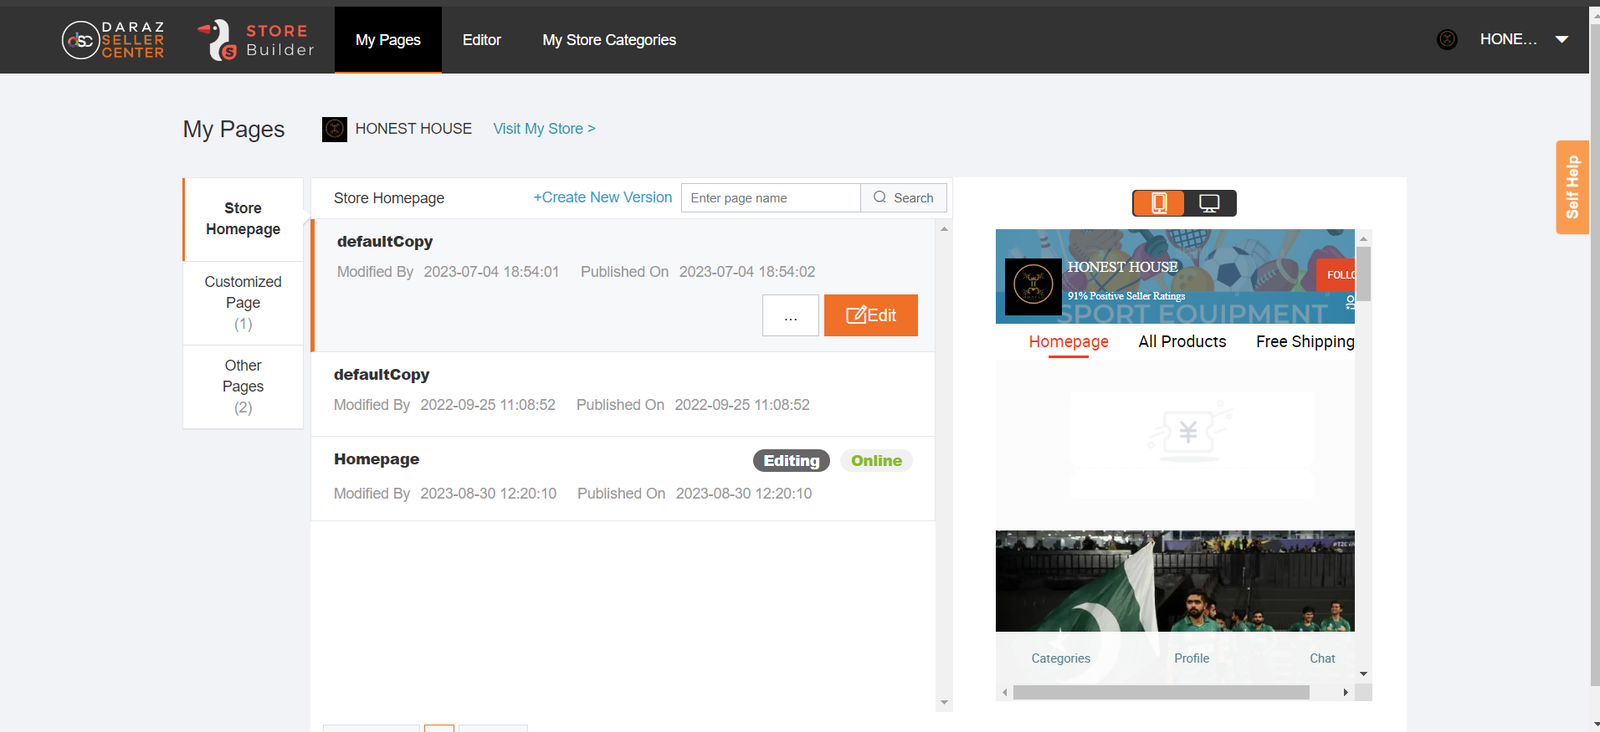
Set up your store:
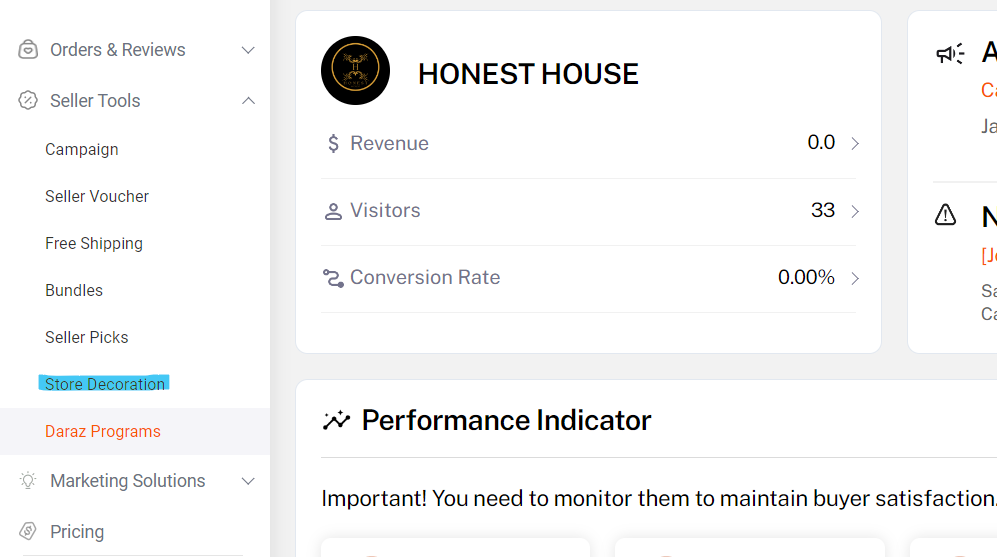
Logo: Upload a professional logo of your store so that buyers can recognize your brand.
Banner Image: Upload an attractive banner image for your store that highlights your products.
Store Description: Write a short and comprehensive description of your stores so that people know about your business.
Learn the Platform:
Tools and Features: Learn the various tools and features of the Daraz platform that will help you manage your business such as orders management, inventory management, and customer service tools.
Marketing and Promotion: Take advantage of the marketing and promotion opportunities provided by Daraz to increase your sales.
Training and Support: Use the training materials and support system provided by Daraz to help you succeed on the platform.
After completing all these steps, your Daraz seller account will be fully set up and you will be able to start selling your products on Daraz’s platform.
Benefits of Selling on Daraz
The following are the advantages of selling on Daraz:
Wide reach: Selling on a Daraz gives you access to millions of potential customers.
Secure Payment System: Daraz ensures secure transactions and timely payments, assuring you that your earnings are safe and will be transferred to your account on time.
Logistics Support: Daraz’s efficient logistics network facilitates the shipping and delivery process.
Tools and Analytics for Sellers: Daraz provides different tools and data that help you effectively manage your sales, inventory, and customer service.
Tips for a Successful Start on Daraz
Here are some important tips for a successful start-up:
Create a complete profile:
Give a complete and interesting introduction to your store.
Use good-quality profile pictures and cover photos.
Clarify the details and features of your store.
Offer quality products:
Offer content that is in demand in the market.
Ensure product quality to minimize customer complaints.
Clarify Product Description:
Provide complete product details such as size, color, material, etc.
Use high-quality images so that customers can get an accurate idea of the product.
Set reasonable prices:
Analyze the market rate and set the prices of your products accordingly.
Keep fair and reasonable prices considering the competition.
Improve customer service:
Respond to customer inquiries promptly and courteously.
Resolve customer complaints and satisfy them.
Offer promotions and discounts:
Offer special promotions and discounts on various occasions.
Get customer attention through sales and deals.
Take care of reviews and feedback:
Try to get positive reviews.
Take customer feedback seriously and improve your services.
Market:
Market your store on social media.
Advertise your products on different platforms so that more people can see your products.
Deliver on Time:
Complete orders on time and notify customers.
Ensure the safety of products during delivery.
Analyze your sales:
Keep a record of your sales and analyze it.
Update your product line keeping in mind customer likes and dislikes.
By following these tips you can start a successful business and achieve your goals
Conclusion:
Daraz is the most popular ecommerce platform in Pakistan. Most people grow their business at Daraz Seller Center. Account creation at the Daraz Seller Center is the first step to starting a business in Daraz.
We discuss the complete steps of “How To Create Daraz Seller Account”: We hope you understand these steps.
Daraz Seller Center is a great way to grow your business online. So, sign up at the Daraz Seller Center website to grow your business and improve the Pakistan economy. May! Your future is bright.
To learn more read our other articles visit our site ammoneymakers.com
FAQs
How much did Daraz take from the seller?
Daraz takes a 5 to 15 percent commission on each product sale, which depends on the product category. Commission rates are different for different categories. Additional fees may include shipping charges and packaging fees.
How many products can be sold on Daraz?
You can sell as many products as you want on the daraz. There is no limit to it. You can increase your sales and customers by listing more products.
How can we boost Daraz’s seller account?
Provide quality products to boost deep seller accounts. Respond promptly to customer queries and complaints and offer discounts. Advertise your store on social media. Additionally, keep an eye out for product reviews and feedback.
How much time does Daraz take to verify the account?
It may take one to three days to verify the seller’s account. This time may depend on various factors, such as the accuracy of the information provided and complete documentation.